ニュース&ガイド
How to Complete the Always Faithful Mission
From Barracks Exploration to Mission Trigger

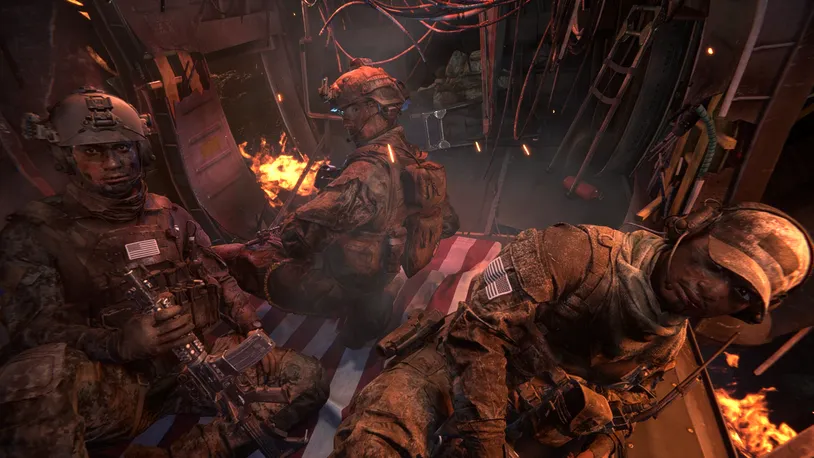
At the beginning of the “Always Faithful” chapter, you will take on the role of Gunnery Sergeant Dylan Murphy waking up in the barracks. This opening sequence is not only an important part of the plot setup but also a crucial moment for familiarizing yourself with game mechanics and collecting hidden elements. This seemingly simple opening actually contains multiple easy-to-miss interaction points and hidden content, requiring careful observation of the environment and full utilization of exploration opportunities.
Barracks Interior Exploration and Hidden Elements
Once you gain control, first look around: your bunk is on one side of the room, opposite are the bunks of your teammates. Immediately turn around and walk towards the back of the room, where there is a table by the window with a key hidden item—a toy dinosaur. Interacting with the dinosaur (by pressing the corresponding interaction key) will trigger the “End of an Era” trophy or achievement, which is one of the easiest-to-miss collectibles in this chapter.
When moving inside the barracks, do not rush to follow the mission indicator arrow. Take time to examine the personal belongings next to each bunk. While these won’t provide direct rewards, they enrich the character’s background story. For example, near Murphy’s bunk, you can see family photos and personal gear. These details help in a deeper understanding of the character’s motivations. Initial interactions with teammates will affect subsequent dialogue options, so do not ignore any interactable NPCs.
Table: Key Interaction Points and Rewards in the Barracks
| Interaction Point Location | Interaction Content | Reward/Effect | Easy to Miss Tip |
|---|---|---|---|
| Back Table | Toy Dinosaur | “End of an Era” Trophy/Achievement | Must turn around to find |
| Murphy’s Bunk | Personal Items Check | Background Story Supplement | No actual reward but enriches the plot |
| Teammate Bunks | Dialogue Trigger | Team Relationship Building | Affects subsequent dialogue options |
| Gear Rack | Weapon Check | Game Mechanics Introduction | Part of the tutorial |
Teammate Interaction and Team Dynamics Establishment
After completing the barracks interior exploration, follow your teammates out of the barracks into the external base area. This path is a critical stage for establishing team dynamics. Dialogue choices with Sgt. Ramirez and Cpl. Jenkins will affect teamwork efficiency in subsequent missions. For example, choosing supportive responses can boost team morale, while questioning responses might lead to fewer support prompts during the mission.
The external base path is linear, but there are multiple groups of soldiers along the way conducting daily activities. Getting close to these groups allows you to overhear conversations, which not only provide background information on the game world but may also contain hints for subsequent missions. Pay special attention to the conversation between two soldiers repairing a Humvee, as they mention potential threats in the area they are about to head to.
As you walk, the game will automatically trigger plot dialogue, introducing the mission’s political background and main objectives. Ensure you do not skip these dialogues, as they contain critical mission information. If you wish to listen carefully, you can appropriately slow down your movement speed, as the game design allows players to control movement pace while dialogue is ongoing.
Hidden Trophy Acquisition and Exploration Tips
The “End of an Era” trophy is the only hidden collectible in this chapter, but its acquisition has a specific technique. The best time to acquire it is immediately after gaining control, as once you start following your teammates out of the barracks, you will not be able to return to the area. The interaction prompt may not be obvious; the toy dinosaur is partially obscured by other objects, requiring a specific angle to trigger the interaction prompt.
For players aiming for all achievements, there are other elements to note in this chapter. Although the “Prepare to Ship Out” section has no other trophies, certain actions will affect achievement unlocks in later chapters. For example, completing interactions with all interactable teammates can accumulate progress for the “Team Builder” achievement, and comprehensive environment exploration is related to the “Recon Specialist” achievement.
Utilizing the game’s lighting and audio cues can help in better discovering hidden content. The area where the toy dinosaur is located has subtle lighting highlights, and a faint audio cue plays when the player approaches. The development team has put a lot of work into these details to help attentive players discover secrets.
Base Path Navigation and Plot Transition
The path from the barracks to the command center is short in linear distance, but the game extends the experience time through clever scene design. Activities on both sides of the path showcase the base’s daily operations, including soldier training, equipment maintenance, and mission briefing scenes. These not only enhance the realism of the game world but also provide opportunities to learn about game mechanics.
As the team approaches the command center, a sudden plot event of chaos in the sky will automatically trigger. This turning point is the critical moment of the chapter; there is about a 10-15 second “calm period” before the event triggers, during which the player can observe the environment freely one last time. After the event occurs, the game will formally transition into an action-intensive sequence.
After the sky chaos event is triggered, control will be temporarily taken away from the player, entering a cutscene. This transition is unavoidable, but players can prepare mentally beforehand, as the pace of the game will significantly accelerate afterward. It is recommended to ensure all exploration objectives have been completed before the event triggers, as you will not be able to return to this area afterward.
Advanced Tips and Preparation for Subsequent Missions
Although “Prepare to Ship Out” is primarily a plot guidance section, advanced players can use this stage to prepare for subsequent missions. Observing the weapon displays and tactical demonstrations in the base can provide clues for later combat. For example, the mission areas marked on the wall map and the types of weapons displayed in the armory hint at the types of enemies to be faced.
Difficulty settings will affect the experience of this section. On higher difficulties, the time limit for dialogue options is shorter, and exploration time is more restricted, requiring more efficient route planning. For novice players, it is recommended to choose a lower difficulty to fully explore and experience the story content.
Survival Guide for Dealing with the Pax Ambush

When the Pax Armata air raid suddenly descends, explosions and chaos will instantly shatter the base’s calm, marking one of the most intense and exciting segments of the entire mission. When the air raid begins, you are with your squad members and need to react quickly. First, stay calm, and stick close to your teammates as you move toward the marked supply truck.
Run to the supply truck, where you will obtain the first primary weapon of the mission, the M4A1 assault rifle. This weapon balances rate of fire, accuracy, and damage, making it an ideal choice for dealing with initial enemies. Immediately equip it and check your ammunition—a standard magazine holds 30 rounds. There are also extra ammunition and grenades in nearby boxes, do not miss the opportunity to collect them.
Utilizing explosive objects in the environment is a trick for quickly clearing enemies. The first few enemies will be standing near red fuel barrels, which only take a few shots to detonate. Aim for the middle of the barrel; the explosion can instantly eliminate surrounding enemies and even damage light vehicles. But be careful to maintain a safe distance to avoid being caught in the blast.
Table: Main Enemy Types and Counter-Strategies During the Pax Ambush Phase
| Enemy Type | Main Characteristics | Recommended Counter-Strategy | Notes |
|---|---|---|---|
| Infantry Unit | Lightly armored, uses assault rifles | Burst fire headshots or detonating environmental objects | Be aware they may throw grenades |
| Machine Gunner | Fixed position, suppressive fire | Flank maneuvers or explosive clearance | Eliminate as a priority to prevent squad suppression |
| Light Vehicle | High mobility, mounted weapon | Shoot the driver or the fuel tank area | Fuel barrel explosion can quickly destroy it |
| Helicopter | Air support, rocket attacks | Concentrated fire from a mounted machine gun | Requires leading the target |
After a brief firefight, the squad will retreat toward the hangar. The hangar provides good cover, but enemies will pour in from multiple directions. While defending the entrance, be aware of possible snipers on the second floor. There are multiple resupply points inside the hangar for health and ammunition. However, a second wave of air strikes will soon hit the hangar directly, and the roof will begin to collapse—at this point, you must quickly move toward the rear exit.
When the hangar collapses, do not linger in the fight, run at full speed to a safe area. A teammate will drive a vehicle to pick you up; immediately jump in and take control of the mounted machine gun. The machine gun overheats quickly, so it’s best to use short bursts rather than sustained fire. Prioritize attacking enemy soldiers and helicopters, as armored vehicles require more time to destroy. Your driver will be wildly swerving through explosions, so maintaining balance and focusing on aiming is key.

When the vehicle drives onto a forest road and seems safe, an armored train in the distance will launch a sudden artillery strike. This ambush is a scripted event and cannot be avoided, but there is a brief audio cue before the shelling. After the vehicle is hit, you will be briefly knocked unconscious, then entering the next phase. The entire Pax Ambush segment tests your ability to adapt quickly and control the pace of the battlefield.
Maintaining close cooperation with teammates is essential for survival. Even in scripted events, following the squad can prevent isolation. Pay attention to teammates’ voice prompts; they will point out threats and opportunities. Rationally allocate weapon usage to ensure fire coverage for targets at different distances.
Counterattack Plan

In the “Always Faithful” mission, the counterattack phase is the critical turning point where the mission shifts from passive retreat to active offense. After you and your squad regroup in the forest, the pace of the game will change significantly—from the previous evasion and survival to an organized offensive action. This part requires precise execution and good team coordination; any mistake could lead to the failure of the entire counterattack plan.
Forest Regrouping and Advance Route
After regrouping with the squad, the primary task is to advance in the northeast direction toward the marker of the orange fluttering cloth. This path cuts through dense forest, providing good cover, but you must also be alert to enemies possibly lurking in the woods. As you approach the forest edge, look out for additional ammunition resupplies on the ground, which are vital resources for your subsequent battles.
The first collectible of the mission is hidden in the forest, located next to a fallen tree trunk, near a makeshift temporary camp. Collectibles usually emit a faint glow, and an interaction prompt appears when you approach. Do not rush out of the forest—first ensure the entire squad is ready, and all members have replenished their ammunition before proceeding.
Upon exiting the forest, you will see a ruined building occupied by two snipers. These snipers are key NPCs for the mission, and interacting with them will trigger the plot for the counterattack plan. As you approach the ruins, use the debris as cover, avoiding exposure in open areas, as there may still be scattered enemy patrols around.
Laser Designator Operation and Target Marking
Sgt. Jackson will hand you the laser designator, a key tool for calling in air support. Using the laser designator has a specific technique: hold the aim button to stabilize the device, then use the fire button to lock onto the target. Each target needs to be continuously locked for a few seconds to complete the marking.
The positions of the three armored vehicles are distributed, and they need to be addressed in a specific order: the nearest one is at the road corner, the middle one is next to the abandoned checkpoint, and the farthest one is near the server building entrance. It is recommended to mark them from near to far, as this can create a continuous chain of explosions during the air strike, maximizing the destructive effect.
During the marking process, ensure you are in a safe position. The ideal location is the second floor of the ruined building, which offers good visibility and relative concealment. Marking requires the laser to remain stable and aimed at the target; any movement or interruption will result in marking failure. If interrupted by enemies, prioritize eliminating the threat before continuing the marking.
Table: Common Issues and Solutions for Laser Designator Use
| Common Issue | Cause Analysis | Solution |
|---|---|---|
| Marking Failure | Target is obscured or too far away | Adjust position to ensure clear line of sight |
| Unstable Laser | Player movement or taking damage | Find cover, ensure safety before marking |
| Target Not Recognized | Not aimed at a critical spot | Aim at the center or engine area of the vehicle |
| Air Strike Delay | Incorrect marking sequence | Mark one by one in the order prompted by the game |
Air Strike Coordination and Enemy Countermeasures
After successfully marking all targets, air support will quickly respond, conducting precision strikes on the three armored vehicles. The air strike’s power is sufficient to eliminate all targets at once, but this also means your team will be exposed to the enemy’s retaliatory fire. Immediately after the air strike, the enemy will mobilize anti-aircraft units to shoot down your support aircraft.
The critical window after the air strike is only a few tens of seconds, and you must use this time to advance quickly. When the enemy’s attention is diverted by the air strike, it is the best time for the squad to move forward. Move along the cover on the right side of the road, avoiding direct exposure in open ground.
The anti-aircraft units are usually positioned on the roof of the low-rise building to the left of the server building. If you want to reduce the difficulty of subsequent tasks, you can consider assigning a team member specifically to deal with these anti-aircraft units, but be aware that this may divert forces from assaulting the server. Weighing the pros and cons before making a decision is key.
Server Building Assault Strategy
After clearing the armored vehicles, the server building becomes the final objective. The building entrance is heavily guarded, including several heavy soldiers and a machine gun emplacement. It is recommended to divide into two groups: one group draws fire from the front, and the other attempts a flanking maneuver.
The internal structure of the building is complex, with multiple layers of defense. The first floor is mostly open space with sparsely distributed enemies; the second floor has the control center and server room, but the stairs leading up are heavily defended by enemies. Using throwables like flashbangs or grenades for clearing is an efficient option.
After taking control of the server, the mission enters the next phase, but be wary of enemy reinforcements. Typically, within a few minutes of securing the server, the enemy will launch a counterattack. Ensure your team has established defensive positions and is ready to deal with this wave of attack.
Advanced Tips and Troubleshooting
The laser designator can sometimes encounter a bug where it fails to mark. If this happens, try reloading the weapon or switching weapons before using the designator again. If the issue persists, check if a teammate has already started the marking process—only one person can perform the marking operation at a time.
The difficulty setting affects the marking time. On higher difficulties, marking takes longer, and enemies are more sensitive to the use of the laser designator, locating your position faster. Adjust your strategy accordingly and move immediately after marking is complete.
Teamwork is essential for success. When one member is using the laser designator, other members should provide covering fire and eliminate approaching enemies. Good communication can ensure the marking process is uninterrupted, and air support arrives on time.
Server Destruction and Data Protection

In the “Always Faithful” mission, destroying the server is a critical action to prevent sensitive data from falling into the hands of Pax Armata. This mission stage begins after air support is disabled, and the command is to immediately destroy the NATO server. The mission scenario is set within a complex construction site and an adjacent office building, requiring you to push from the perimeter to the core server room, plant C4 explosives, and ensure the target is completely destroyed.
Mission Start and Initial Movement Strategy
When the mission begins, you are at an elevated position and need to move northeast down the slope towards the construction site. This path is relatively open, but there are several natural cover points like rocks and abandoned vehicles that can be used to avoid premature exposure. Keep the squad concentrated when moving, but do not huddle together to avoid being wiped out by explosives. It is recommended to use alternating cover movement tactics: one part of the team provides covering fire, the other advances, and then they rotate.
As you approach the construction site, enemies will appear from multiple directions. The first wave of enemies is primarily light infantry, using standard rifles, but subsequent support vehicles will arrive, bringing stronger units. At this time, you first acquire fragmentation grenades; using them judiciously can quickly clear clustered enemies. Grenades are particularly effective against groups hiding behind cover, but be mindful of the throwing angle to prevent them from bouncing off obstacles and back towards you.
Table: Construction Site Enemy Types and Counter-Strategies
| Enemy Type | Primary Weapon | Behavioral Characteristics | Best Counter-Strategy |
|---|---|---|---|
| Light Infantry | Assault Rifle | Moves quickly, seeks cover | Headshots or grenade clearance |
| Heavy Soldier | Light Machine Gun | Suppressive fire, moves slowly | Flanking attack or explosives |
| Sniper | Sniper Rifle | Long-range attack, concealed position | Quick approach or use a grenade to flush them out |
| Vehicle Gunner | Mounted Machine Gun | Fixed position, high damage | Use a grenade launcher or attack from the rear |
 Construction Site Combat and Resource Management
The construction site is the first large engagement zone in the mission, with complex terrain, multiple levels, and cover options. Prioritize clearing enemies in high-ground positions, such as the crane operator cabin and snipers on the roof, as these positions have a wide field of view and pose a significant threat. Your teammate AI will automatically seek cover, but you can guide them to concentrate fire or defend specific areas using the command system (e.g., marking targets).
Ammunition management is crucial during this stage. White supply boxes are scattered around the area, usually located in corners or next to vehicles. Each supply box provides ammunition, grenades, and medical packs, but the quantity is limited. It’s best to resupply promptly when your stock is more than half-depleted. Eliminated enemies will drop weapons, which you can pick up and use, but be aware that unfamiliar weapons may require adaptation to their recoil and trajectory.
The M230 Grenade Launcher is a game-changer, located next to a soldier’s corpse on the road between the two engagement zones. The corpse is in the middle of the gate leading out of the construction site, and the weapon bag will glow as a prompt. Once picked up, the grenade launcher can instantly eliminate groups of enemies or destroy light armored vehicles, but ammunition is limited (typically 4-6 rounds), so save it for the toughest groups or emergencies.
Server Building Entry and Internal Clearing
After clearing the enemies in the construction site, cross the street into the second construction area. Enemies here are denser, and they may attempt to flank you. Use the grenade launcher to quickly open a path, but be mindful of friendly fire and avoid harming teammates. As you approach the server building entrance, you will find a damaged locker blocking the passage, requiring combined effort with a teammate to lift it. Press and hold the corresponding button when the interaction prompt appears; the entire process takes about 5 seconds, during which you cannot shoot, so ensure the area is safe before proceeding.
After entering the server room, the internal defense is relatively lighter, but do not let your guard down. There are several Pax soldiers in the room, possibly hiding behind server racks. Use assault rifles or submachine guns for close-quarters clearing, avoiding the use of explosives to prevent damage to the mission objective. The server room layout is narrow; prioritize clearing enemies in corners and on the second-floor platform.

C4 Placement and Structural Destruction
Destroying the server requires placing C4 on key support structures. The first C4 point is on the main support column on the first floor. After interacting to place it, the system will prompt you to go to the second floor to find more placement points. At the stairs, you need to perform a “stack up” action: approach a teammate and press the interaction key to enter the queue, then click the teammate in front to initiate a breach. The second floor is office space; the second C4 point is on a central column, clear the surrounding enemies before placing it.
The C4 placement order does not affect mission completion, but it is recommended to start from the first floor to ensure foundational destruction. After placing all C4, the mission updates to evacuation, but the detonation is automatic, no manual operation is required. Enemies may reinforce during placement, so leave one teammate to guard the entrance.
Collectibles and Hidden Content
The second collectible (Rebecca Gibbson’s dog tags) is located in the second-floor office. Turn left from the C4 column, facing the sunny windows. Near the first column on the left, there is a bulletin board, and the dog tags are fixed to it by a dagger. Collecting it does not affect the main plot but provides background story and achievement progress.
The environment has multiple destructible objects, such as wooden pallets, which can be destroyed by shooting to eliminate enemy cover. Certain walls have weak points; explosives can open shortcuts or hidden areas, but excessive use is not recommended inside the server room to avoid accidental death.
Advanced Tips and Common Issues
Team commands are key to success. Use the command system to have teammates provide covering fire or defend specific points. For example, when placing C4, set teammates to defend the stairwell entrance to prevent enemy interference.
Difficulty scaling affects enemy numbers and intensity. On higher difficulties, enemies are smarter, will flank, and use explosives. Adjust your strategy, advance more cautiously, and use all available resources.
Common issue resolution: If the grenade launcher does not appear, try reloading the checkpoint. If enemies are stuck, use a grenade to flush them out. Mission failure often stems from being too aggressive; patiently clear the area before advancing.
From Rooftop Defense to Final Stand

In the evacuation preparation phase of the “Always Faithful” mission, a successful extraction depends on thorough preparation and flexible tactical adjustments. This part begins after the explosives are set; you and your squad need to move from inside the building to the rooftop and hold off the enemy’s fierce assault while waiting for the rescue helicopter to arrive.
Regrouping and Transfer After Explosives are Set
After setting all the explosives, the team needs to quickly rally towards the elevator shaft. Do not linger too long at the original spot, as Pax Armata soldiers will quickly swarm the area. There are usually scattered enemies on the path to the elevator shaft; use burst fire rather than full auto to conserve ammunition, as these enemies are just the vanguard, and the real heavy fighting is yet to come.
Upon reaching the elevator shaft, the climbing process requires mutual cover among teammates. Ideally, the team should split into two groups: one group climbs first, and the other provides security below. During the climb, pay attention to teammates’ prompts, as they might point out threats appearing above. The elevator shaft itself is relatively safe, but enemies might be ambushed near the top exit; it is advisable to throw a flashbang or grenade before fully ascending to the rooftop.
Table: Key Nodes and Counter-Strategies During the Evacuation Preparation Phase
| Phase | Main Objective | Common Threat | Counter-Strategy |
|---|---|---|---|
| After Explosives Set | Rally towards elevator shaft | Scattered enemy harassment | Move quickly, avoid getting bogged down in combat |
| Elevator Shaft Climb | Reach the rooftop safely | Enemies ambushed above | Climb in batches, use throwables to clear the way |
| Rooftop Defense | Hold out for extraction | Multi-directional enemy attack | Utilize cover, manage ammunition |
| Helicopter Extraction | Board the helicopter and evacuate | Enemy rocket attacks | Smoke cover, board in batches |
| Final Stand After Crash | Survive until the end | Full-scale enemy siege | Conserve ammunition, utilize the environment |
Tips for Acquiring the Final Collectible
Before ascending to the rooftop, do not miss the last collectible (Kevin Olsson’s dog tags). It is located to the right of the elevator exit, on a concrete block, next to an orange water dispenser and coffee cups. This location is easily overlooked in a hurry, especially when the team is rushing to deploy defenses. There is also an ammunition box below the collectible, providing a chance to resupply resources.
After acquiring the collectible, immediately rejoin the team and move into a defensive position. Do not stray too far from the team for the sake of collecting; the rooftop area is relatively open, and being alone makes it easy to be isolated and eliminated by the enemy. If you are playing as a medic, ensure you monitor the health status of your teammates during movement and provide timely treatment.
Tactical Deployment for the Rooftop Defense Battle
Rooftop defense is the most critical segment of the evacuation preparation phase. The ideal defensive position should have the following characteristics: good visibility, reliable cover, and convenient ammunition resupply. The machinery in the center of the rooftop usually provides the best cover, but be aware that enemies may climb up from the side stairs and ropes.
Enemies will launch attacks from multiple directions, including the stairs directly ahead, the ventilation duct on the right, and the ropes on the left. It is wise to assign team members to guard different directions: snipers or precise rifle users handle long-range enemies, while shotgun or submachine gun users counter close-quarters threats. If there is a support soldier in the team, their provided ammunition box should be placed centrally towards the back, convenient for all team members to resupply.
The grenade launcher is a potent weapon in the defense battle, but must be used cautiously. Its blast radius may cause friendly fire, so it is best reserved for dealing with groups of enemies or light armored units. When you hear heavy footsteps or engine sounds, it means heavy units may be appearing; conserving grenade launcher ammunition at this time is particularly crucial.
Dynamic Response During the Extraction Phase
After a few minutes of defense, the rescue helicopter will arrive. During the helicopter’s descent, the enemy attack will become more intense; this is the moment most prone to a breach. The team should maintain formation, not rush toward the helicopter, but gradually move backward while continuing to provide covering fire.
The boarding order needs team coordination. Heavily wounded and medics should board first, followed by support soldiers, and finally the members responsible for covering the rear. During boarding, use smoke grenades to create a visual obstruction, reducing the chances of being hit by the enemy. If there is a sniper in the team, they should continue to provide covering fire from the helicopter, covering the path for teammates to board.
The helicopter being shot down is a scripted event and cannot be avoided. After the crash, the team will be briefly stunned, waking up with minimal resources left. At this point, the most important thing is to quickly rally the remaining members and use the wreckage as temporary cover. The protection provided by the wreckage is limited, but it is far better than being completely exposed in the open.
Survival Strategy for the Final Stand
The final stand after the crash is the most difficult part of the mission. The team typically has only a small amount of ammunition and medical resources left, requiring extremely cautious use of every bullet. Prioritize headshots to maximize damage output. If possible, scavenge weapons and ammunition from eliminated enemies; their gear might be better than what you currently have.
The choice of defensive position directly affects survival time. Ideally, form a semi-circular defensive perimeter with your backs against the wreckage or rocks, avoiding being flanked by the enemy. When the screen begins to darken, it means the mission is nearing its end; at this point, you only need to withstand a few more waves of attacks. Even if all team members go down, the mission will still be successfully completed if a specific time point is reached.
Enemies in the final phase are usually infinite; do not attempt to eliminate them all. The goal is to delay time as much as possible. Use grenades and explosives to create a buffer zone. When enemies get too close, you might consider sacrificing a member for a close-range explosive attack to buy time for other teammates.