ニュース&ガイド
ヘルダイバー2』の各サンプルタイプと入手方法
In Helldivers 2, you can find Common (green) Samples on any difficulty, Rare (orange) Samples on Challenging difficulty or higher, and Super (pink) Samples exclusively on Suicide Mission difficulty and above, often near distinctive rock formations or Points of Interest, and you must successfully extract to keep them .
From Common to Super Rare
In “Helldivers 2,” Samples are the key resource for upgrading your Super Destroyer modules, divided into three rarity levels: Common (Green), Rare (Orange), and Super (Pink). These glowing resources are scattered throughout mission maps and require players to diligently explore while completing the main objective. Sample collection not only affects personal progression but also directly relates to the entire team’s equipment strength enhancement.
Sample Types and Basic Characteristics
Common Samples (Green) are the most basic sample type, appearing as green glowing objects, usually found in small clusters near various structures, destroyed bug holes, and around mission objective points.
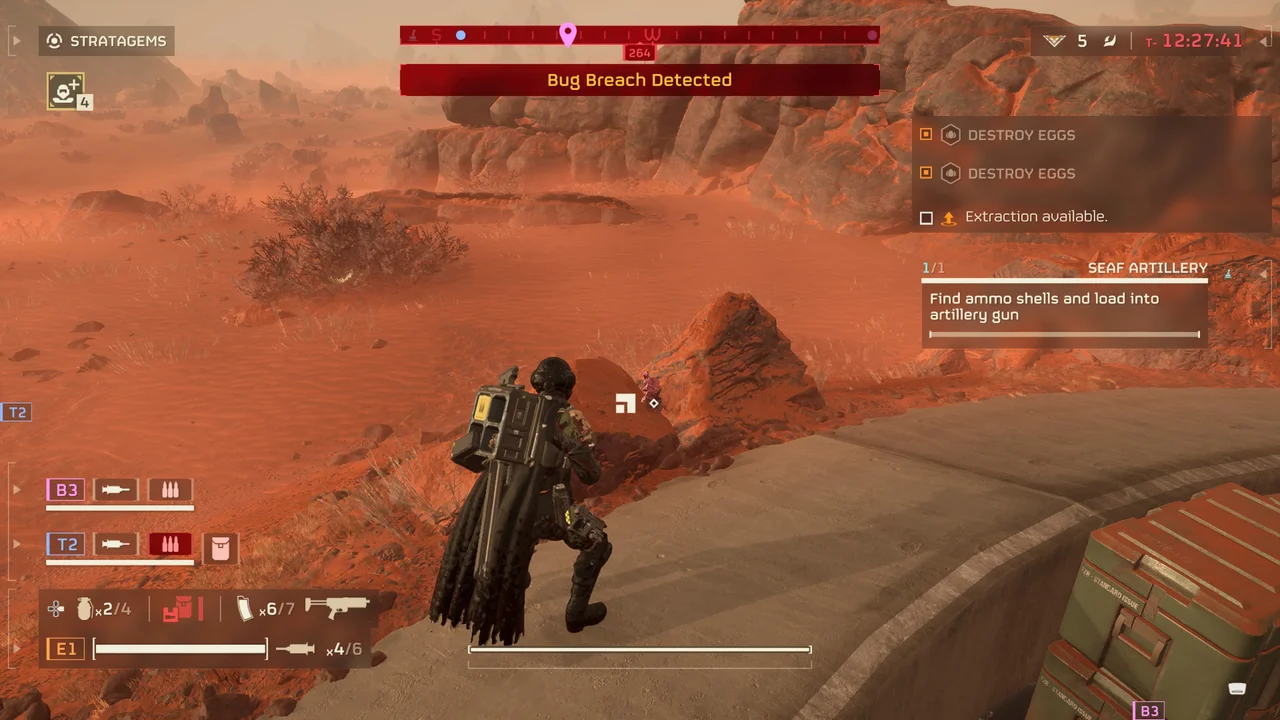
Rare Samples (Orange) are more valuable than Common Samples, exhibiting a striking orange glow. They primarily appear in missions at Difficulty 4 (Challenging) and above. These samples are not typically scattered randomly but are associated with specific enemy strongholds or high-value targets. After clearing medium and large bug nests, there is a high chance of finding Rare Samples nearby. Areas around Terminid Egg Nests are also hotspots for finding Orange Samples, sometimes even before destroying all the eggs.
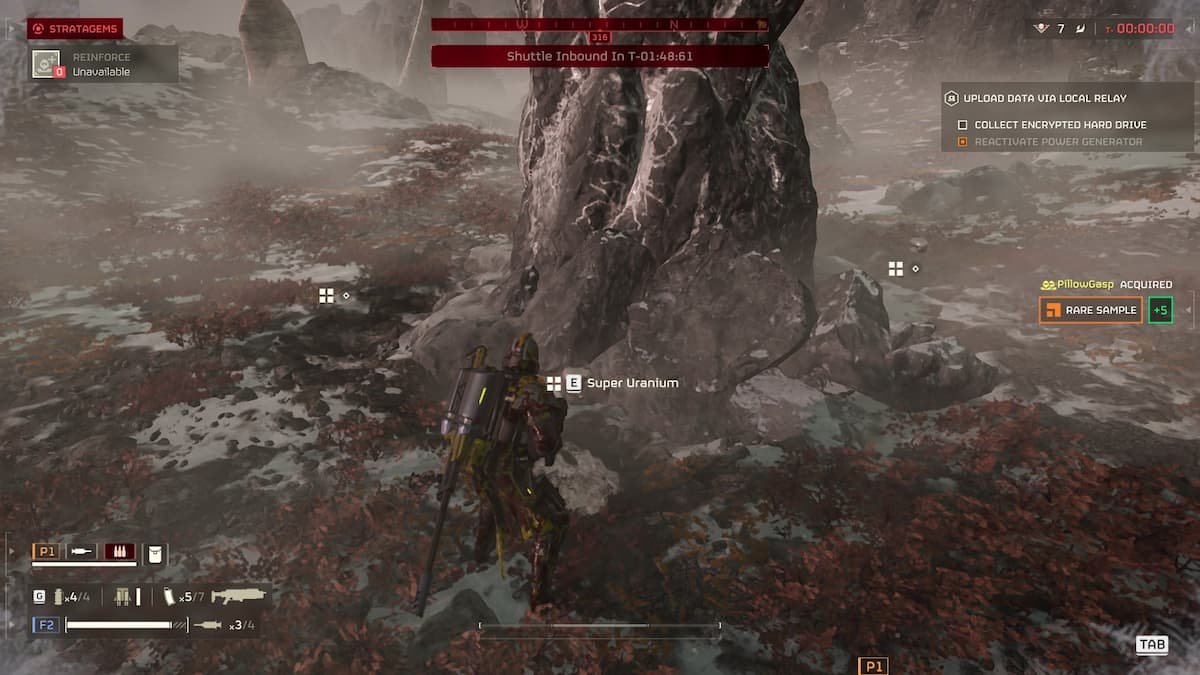
Super Samples (Pink) are the rarest type of sample in the game, emitting a unique pink glow. They only appear in high-difficulty missions at Difficulty 7 (Suicide Mission) and above, including Suicide Mission, Impossible, and Helldive difficulties. Acquiring these samples requires facing the game’s most powerful enemies and most adverse combat environments. Players can carry a maximum of 3 Super Samples per mission.
Table: Sample Types, Difficulty Relationship, and Acquisition Advice
| Sample Type | Color | Appearance Difficulty | Approximate Quantity Per Mission | Primary Source |
|---|---|---|---|---|
| Common Samples | Green | Easy and above | 7-15 | Structures, destroyed bug nests |
| Rare Samples | Orange | Challenging (Level 4) and above | 3-8 | Medium/Large bug nests, Terminid Egg Nests |
| Super Samples | Pink | Suicide Mission (Level 7) and above | Maximum 3 | Spore Spewers, specific high-difficulty points |
Efficient Collection Strategies and Tips
Mission type selection significantly impacts sample collection efficiency. Eradicate missions usually have smaller maps and clear objectives, making them suitable for quickly gathering Common Samples—these missions can yield about 7 Green Samples every 10 minutes, some even up to 15 within 10 minutes. For players seeking Rare and Super Samples, Attack and Blitz missions, while having larger maps and longer exploration times, often contain more high-value sample locations.
Teamwork is key to boosting sample collection efficiency. Squad members can split up to explore different areas and use the in-game marking system to point out sample locations to each other. Crucially, any samples collected by any squad member are shared across the entire team upon successful extraction. Experienced teams often designate one player to be solely responsible for sample safekeeping, while others provide covering fire.
Utilizing game mechanics can greatly increase the success rate of sample collection. Completing the Radar Station side objective reveals all Points of Interest on the map, including sample locations, essentially providing the team with a wallhack. Wearing light armor increases movement speed, making exploration more efficient. Furthermore, planning the collection route to gather samples en route to the main objective, rather than deviating specifically for samples, balances mission completion efficiency with sample gain.
Sample management in high-difficulty missions requires special attention. In missions at Difficulty 7 and above, enemy strength and numbers increase significantly, making Super Sample collection extremely dangerous. It is recommended to secure the main objective first before attempting to collect Super Samples. Dropping collected samples near the extraction point and picking them up only after the extraction signal is called can effectively mitigate the risk of losing them due to unexpected death.
From Recovery to Safe Extraction
In “Helldivers 2,” successfully storing Samples is crucial for upgrading ship modules, a process that requires strategy and team coordination. Samples are not permanently saved immediately upon collection; they must be secured by successfully extracting from the mission.
Sample Fundamentals and Recovery Mechanism
There are three types of Samples in the game: Common Samples (Green) appear in any difficulty, Rare Samples (Orange) require Challenging difficulty or higher to find, and Super Samples (Pink) only appear in Extreme difficulty and above. These Samples are necessary for upgrading Ship Modules; for instance, unlocking the first 18 Ship Modules requires 1380 Common Samples, 770 Rare Samples, and 65 Super Samples.
The core mechanism of Sample recovery is team sharing. Any Samples collected by any squad member will be distributed to the entire squad upon mission success. This means Samples are not personal property but a team resource. Even if you personally did not collect any Samples, as long as your teammates did and the squad successfully extracted, you will receive the corresponding Sample reward.
Table: Sample Type, Storage Cap, and Main Use
| Sample Type | Icon Color | Individual Carry Cap | Account Storage Cap | Main Use |
|---|---|---|---|---|
| Common Samples | Green | No explicit limit | 500 | Upgrading basic Ship Modules |
| Rare Samples | Orange | No explicit limit | 250 | Upgrading intermediate Ship Modules |
| Super Samples | Pink | Maximum 3 per mission | 100 | Upgrading advanced Ship Modules |
Safety Storage Strategy and Practical Tips
The “mid-mission storage” strategy is an effective way to mitigate risk. When you pass by the extraction zone but haven’t completed the main objective, you can deliberately drop collected Samples as temporary storage. The specific operation is: hold down the X key (keyboard) or the Down D-pad button (controller) to open the radial menu, and select the “Drop Sample” option in the bottom right.
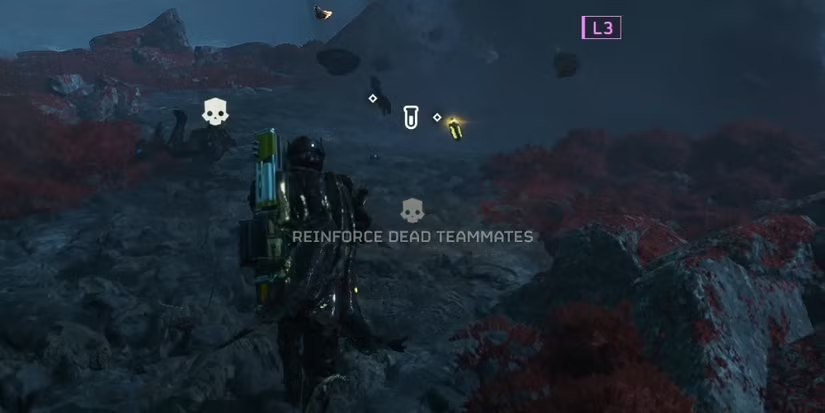
The Sample drop and pickup mechanics must be understood. When a player dies, they drop all carried Samples. These dropped Samples can be picked up by any teammate. In high-risk situations, one player can carry Samples to a safe area to “stash” them, while other teammates provide cover. This division of labor maximizes team survival and Sample retention probability.
The extraction plan should be made in advance. Ideally, the team should start moving towards the extraction point 5-7 minutes before the countdown ends. Arriving at the extraction point early allows the team time to clear the area of enemies and safely call in the extraction shuttle. During the shuttle arrival, the team should establish a defensive position to ensure all members (especially the one carrying the Samples) can safely board.
Teamwork and Risk Management
Sample storage is a typical team coordination activity. Game designer Johan Pilestedt explicitly stated that they “dynamically create points of cooperation through shared supply Stratagems, sample containers dropping when players die, and calling in reinforcements.” This means Sample management is fundamentally a design to promote player interaction.
Team roles can increase Sample storage efficiency. An effective strategy is to designate one player as the “Sample Admin,” responsible for collecting and holding Samples early in the mission. Other teammates can then focus on combat and mission objectives. When the team approaches the extraction point, all members can transfer their Samples to one player, who is then responsible for boarding with the Samples, while others provide covering fire.
Risk management is a critical part of Sample storage. In high-difficulty missions, environmental threats and enemy density increase significantly. Successful teams balance Sample collection with mission progress, avoiding greed that could lead to losing already collected Samples. An important principle is: if a player carrying a large number of Samples dies in a dangerous area, sometimes it is wiser to abandon those Samples than to risk attempting recovery, as a team wipe could lead to mission failure and the loss of all Samples.
Practical Tips and Common Issues
- Map Marking: Use the in-game marking system to indicate Sample locations and the extraction path, helping the team maintain orientation.
- Sample Management: Regularly check the team’s collected Sample count (displayed in the top right corner of the screen) and adjust the strategy accordingly.
- Communication Coordination: If voice chat is unavailable, use the in-game quick communication menu to convey Sample-related intentions.
- Prioritization: Complete the Main Objective first, then collect Samples, and finally deal with Side Objectives, ensuring basic progress.
From Collection to Ship Upgrades
In “Helldivers 2,” Samples are your sole currency for upgrading Super Destroyer Modules. Unlike resources automatically earned upon mission completion, Samples require you to personally find and collect them at the mission site, and successfully extract to ultimately secure them.
Sample Usage Location and Operation Process
To use the Samples you’ve painstakingly collected, you need to go to the Ship Management Terminal on your Super Destroyer. This terminal is usually located in the Bridge area of the ship, specifically, it’s the noticeable computer directly opposite you after you wake up from the cryo-pod.
The operation process is straightforward:
- Walk up to and interact (press the corresponding action button) to open the Ship Management interface.
- In the management interface, choose to enter the “Ship Modules” submenu.
- Here, you will see a module upgrade tree divided into six major departments, each focusing on enhancing specific categories of Stratagems.
- Browse the available upgrade options, check their effects and required Sample costs (including Common, Rare, and even Super Samples).
- If you possess enough Samples, select the desired upgrade and confirm the purchase.
Upon successful upgrade, the corresponding module effect becomes permanently active, requiring no extra equipment. Your Super Destroyer may also undergo subtle visual changes, such as the addition of NPC crew members on the bridge, making the ship feel more dynamic.
Six Module Departments Detailed
The Ship Module system clearly divides the upgrade path into six departments. Each department represents a specific functional area of your ship and focuses on enhancing a certain type of Stratagem. These six departments include:
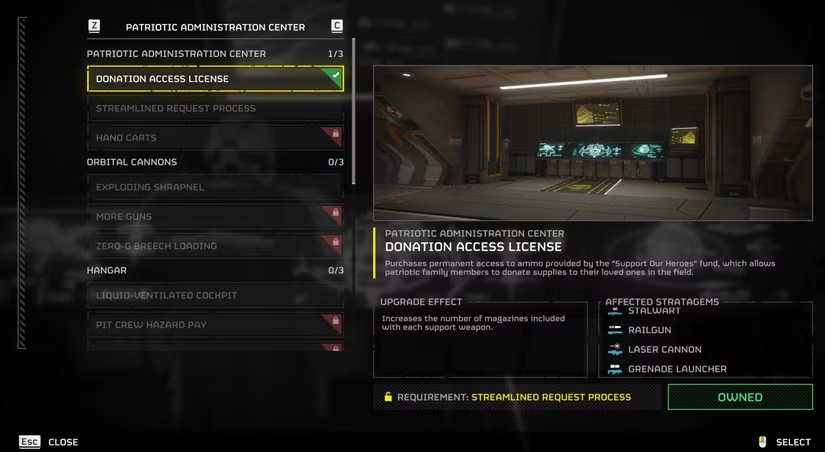
- Patriot Administration Center: Focuses on enhancing your personal equipment, namely Support Weapons and Backpack Stratagems. Upgrading here directly improves your personal firepower sustainability and functionality during ground combat.
- Orbital Cannons: Responsible for upgrading the large-scale Orbital Bombardment directly launched from the Super Destroyer. These upgrades aim to enhance the power, range, or cooldown efficiency of Orbital Strikes.
- Hangar: Dedicated to enhancing Stratagems executed by the pilot-controlled “Eagle” fighter. Hangar upgrades mainly revolve around boosting the Eagle’s strike frequency, the payload capacity per sortie, and the efficiency of return preparation.
- Bridge: This is a more comprehensive category, with upgrade effects covering various aspects such as shortening the call-in time for Orbital Strikes, enhancing battlefield reconnaissance capabilities, and improving Hellpod handling.
- Engineering Bay: Primarily enhances the durability and deployment efficiency of various defensive structures and Sentry turrets. Investing here means you favor building strong positions for area defense combat.
- Robotics Workshop: Focuses on boosting the combat effectiveness of automated Sentry turrets, such as increasing ammo, shortening deployment time, or increasing target acquisition speed. This is the upgrade path designed for players who prefer using automated weapons for suppressive fire.
Table: Major Ship Module Upgrade Examples and Effects
| Module Department | Representative Upgrade | Main Effect | Required Sample Type (Approx.) |
|---|---|---|---|
| Patriot Administration Center | Donated Goods Usage License | Increases the starting ammunition of Stratagem weapons | Common Samples |
| Hangar | Expanded Weapons Bay | Increases Eagle Stratagem uses by +1 | Rare Samples, Super Samples |
| Orbital Cannons | Orbital Precision Strike Optimization | Enhances the damage and radius of Orbital Precision Strike | Common Samples, Rare Samples |
| Engineering Bay | Sentry Engineering Optimization | Increases the durability of Sentry turrets | Common Samples |
| Bridge | Airdrop Procedure Optimization | Shortens the call-in time for all Stratagems | Rare Samples |
| Robotics Workshop | Automated Sentry Ammunition Expansion | Increases the ammunition reserve of automated Sentry turrets | Rare Samples |
Upgrade Strategy and Priority Recommendations
Faced with a multitude of upgrade options, formulating a sound strategy is crucial. Module upgrades must be done sequentially; to unlock powerful high-tier modules, you must first invest in the preceding lower-tier modules. This forces you to make important strategic commitments early to mid-game, as choosing which department to prioritize profoundly influences your gameplay style for the next few dozen hours.
Here are suggestions for different playstyles:
- General and High Priority: The Hangar Module is widely considered one of the highest priority investments. For example, “Expanded Weapons Bay” granting +1 use to Eagle Stratagems offers an immediate tactical advantage. Upgrades in the Bridge Module that shorten Stratagem call-in time also hold significant general value.
- Preference for Bombardment: Prioritize upgrading Orbital Cannons and the Hangar to enhance your air strike and orbital bombardment capabilities.
- Preference for Position Defense: Focus investment on the Engineering Bay and Robotics Workshop to make your Sentry turrets and defensive structures sturdier and more reliable.
- Beginner Entry Path: With limited Samples initially, start with high-value basic modules like “Donated Goods Usage License,” which directly improves your combat sustainability. Then, choose the corresponding department to upgrade based on the Stratagems you use most often.
In team cooperation, encourage teammates to specialize in different module paths. A player focused on Orbital Strikes, combined with a player proficient in Eagle Airstrikes, and a player skilled at deploying Sentry formations, can form a powerful team with complementary firepower and diverse tactics.
Important Mechanics and Notes
When using Samples, keep the following in mind:
- Samples are shared, upgrades are permanent: Upon successful extraction, all Samples collected in the mission are equally distributed among every member of the squad. You do not need to worry about teammates “stealing” your Samples. Moreover, module upgrades are permanent; once unlocked, you benefit from them indefinitely.
- Samples are not automatically saved, extraction is key: The Samples you collect during a mission are only permanently added to your account upon successful extraction. If you die in the mission, the Samples you were carrying are dropped and need to be retrieved by a teammate or yourself upon reinforcement. Mission failure means all Samples collected during that mission are lost.
- Cost and Planning: Upgrades to Ship Modules, especially advanced ones, require a large quantity of Samples. For instance, some top-tier upgrades may require Super Samples, which are only obtainable in high-difficulty missions.