Noticias&Guías
What Is Extra Padding In Helldivers 2
From Survivability to Combat Loadouts
In Helldivers 2, Armor Rating directly determines your survivability, serving as the core metric for armor protection. A higher Armor Rating signifies better damage absorption, allowing you to endure longer under heavy enemy fire.
Armor Types and Attribute Balance
Armor in the game is divided into three main categories: Light, Medium, and Heavy Armor, each balancing Armor Rating with other attributes differently. Light Armor typically has the lowest Armor Rating (approx. 50-80) but offers optimal movement speed and stamina regeneration, ideal for highly mobile scouting and flanking roles. Medium Armor strikes a balance between Armor Rating (approx. 90-130) and mobility, making it a reliable choice for most situations. Heavy Armor provides the highest Armor Rating (140+), but significantly reduces movement speed and increases stamina consumption.
The relationship between Armor Rating and damage absorption is not a simple linear ratio. Based on practical testing, a 50-point increase in Armor Rating (e.g., through the “Extra Padding” passive skill) allows you to withstand approximately 1-2 more body shots before being downed. For armor with a baseline rating around 100, this means a survivability increase of about 20-30%; for high-rating Heavy Armor, the relative increase is smaller, but the absolute value is higher.
Table: Armor Type Attribute Comparison and Best-Fit Scenarios
| Armor Type | Armor Rating Range | Movement Speed | Stamina Consumption | Optimal Use Scenario |
|---|---|---|---|---|
| Light Armor | 50-80 | Fast (+15% Movement Speed) | Low (-20% Stamina Consumption) | Scouting, flanking, missions requiring quick extraction |
| Medium Armor | 90-130 | Moderate | Moderate | Balanced gameplay, most mission situations |
| Heavy Armor | 140+ | Slow (-10% Movement Speed) | High (+30% Stamina Consumption) | Defense missions, frontal assault, high difficulty content |
Armor Rating and Damage Reduction Mechanism
Armor Rating directly affects the amount of damage you can withstand, but the game uses a complex damage calculation rather than a simple percentage reduction. Real-world testing shows that different sources of damage are affected by armor rating differently. Explosive damage is significantly influenced by Armor Rating, while persistent damage effects (such as burning or bleeding) may partially bypass the armor’s protection.
The “Extra Padding” passive skill boosts Armor Rating by 50 points, which generally translates to surviving 1-2 extra enemy hits. For example, a Medium Armor with a rating of 100 might be downed after 3 hits, whereas with “Extra Padding” (rating 150), it might withstand 4-5 hits. The protection against headshots is even more pronounced, typically offering about a 50% increase in critical hit tolerance.
Armor Rating interacts with stance and positional factors. Crouching or going prone provides additional damage reduction, and combined with a high Armor Rating, significantly boosts survival rate. Similarly, attacks hitting different body parts affect the actual damage taken, and a high Armor Rating maximizes these stance advantages.
Passive Skills and Armor Rating Synergy
Passive skills can drastically alter the actual effectiveness of the armor. “Extra Padding” directly increases the Armor Rating, while “Democratic Protection” provides a 50% chance to ignore lethal damage (Medium Armor only), creating an extremely resilient combination when paired with a high baseline Armor Rating.
The “Fortified” passive skill (Heavy Armor only) provides 50% explosive damage resistance. This synergizes with a high Armor Rating, allowing you to survive intense explosions. Tests show that wearing Heavy Armor with the “Fortified” skill, you might only take minor damage when crouching or going prone 4 meters from an explosion, while you would be instantly eliminated without this protection.
The Light Armor exclusive “Scout” passive skill, while not directly boosting Armor Rating, indirectly enhances survivability by reducing the enemy detection range (up to 30% reduction when standing during the day) and providing a radar scan every 2 seconds, compensating for the low Armor Rating.
Mission-Specific Armor Selection Strategy
Different mission types require different armor strategies. For Defense missions, Heavy Armor with a high Armor Rating and the “Fortified” skill can effectively withstand a siege; while Light Armor might be more suitable for Scouting and Collection missions, even with its lower Armor Rating, as the mobility advantage is more critical.
The enemy faction also influences the importance of Armor Rating. Against Automatons, a high Armor Rating provides better resistance to gunfire; whereas against the Terminids, mobility might be more important than absolute protection, as many threats are melee attacks that can be dodged with higher mobility.
Team composition should also affect your armor choice. If the team already has a Heavy Armor tank, you might opt for Medium or Light Armor to take on support or scouting roles. A balanced team armor setup is more effective than everyone pursuing the highest Armor Rating.
Advanced Tips and Combat Application
Armor Rating is not the only consideration. Some high-rating armor may lack useful passive skills, while slightly lower-rated armor with ideal passive skills may be more effective in practice. For instance, Heavy Armor with the “Servo Assisted” skill offers a 30% increase in grenade throw distance and 50% limb health, which is more valuable in certain situations than a mere high rating.
Environmental factors interact with Armor Rating. Under certain planetary conditions, such as extreme temperatures or magnetic storms, armor attributes may be affected. A high Armor Rating may offer additional protection in harsh environments, but the corresponding movement speed penalty could also increase risk.
The latest game updates introduced new armor options, such as the “Correct Officer” Medium Armor and “Jackboot” Light Armor, both featuring the “Ballistic Padding” passive skill, which enhances resistance to torso damage, explosive damage, and bleeding damage. These new choices allow players to gain specific protective advantages while maintaining a moderate Armor Rating.
From Basic Mechanics to Combat Application

In Helldivers 2, “Extra Padding” is an armor passive skill exclusive to Medium and Heavy Armor, which directly boosts your Armor Rating, thereby enhancing your damage reduction against all damage types. Unlike passives that provide specific resistance (such as anti-explosive, anti-fire), Extra Padding offers a comprehensive and direct increase in survivability, allowing you to withstand more hits on the battlefield.
“Extra Padding” Core Mechanism and Detailed Effects
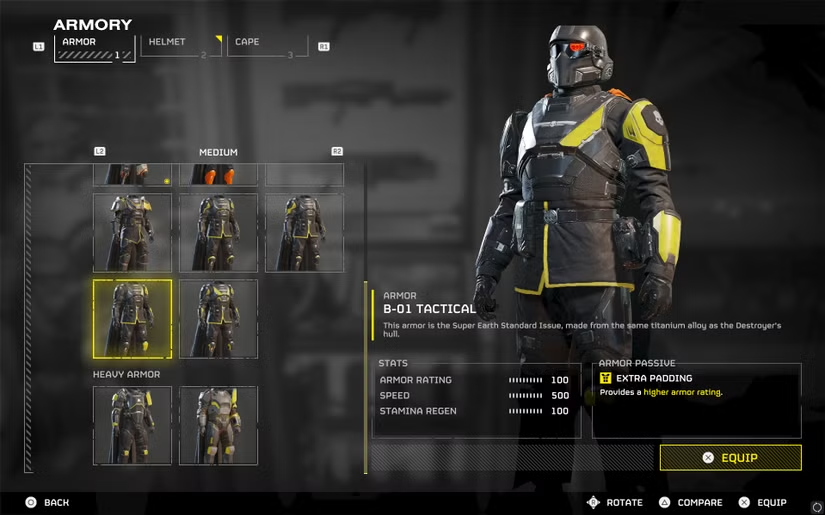
The effect of the “Extra Padding” passive skill is an increase of 50 points in Armor Rating. This means that equipping armor with this passive will boost your base armor value by 50 points. For example, a Heavy Armor with a base rating of 150 will reach an actual Armor Rating of 200 with Extra Padding.
The relationship between Armor Rating and damage reduction is not a simple linear ratio, but a higher Armor Rating indeed significantly increases survivability. According to tests, armor with Extra Padding allows players to withstand 1-2 more direct enemy hits before being downed. For headshot damage, there is an additional reduction in headshot damage when the total Armor Rating exceeds 100 points.
Crucially, Extra Padding does not impose any penalties on movement speed or stamina regeneration. This is unlike the game’s weight system—only the armor’s inherent weight class (Light, Medium, Heavy) affects movement speed, while Extra Padding, as a passive skill, only enhances protective capability.
Table: “Extra Padding” vs. Other Defensive Passive Skills
| Passive Skill Name | Main Effect | Optimal Use Scenario | Compatible Armor Types |
|---|---|---|---|
| Extra Padding | Armor Rating +50 | All-around protection, coping with various damage types | Medium Armor, Heavy Armor |
| Fortified | Explosive Resistance +50%, reduced recoil | Countering explosive enemies (like Bile Spewers) | Heavy Armor |
| Fire Resistance | Fire Resistance +75% | Fire environments or against fire enemies | All Armor Types |
| Democratic Protection | 50% chance to ignore lethal damage | High-risk, high-difficulty missions | Medium Armor |
| Engineering Kit | Grenade capacity +2, reduced recoil | Scenarios requiring frequent use of explosives | Light Armor, Medium Armor |
Applicable Armor Types and Acquisition Methods
The “Extra Padding” passive primarily appears on Medium and Heavy Armor, consistent with the game’s overall balance design. Light Armor focuses on mobility and stealth, while Medium and Heavy Armor prioritize protective capability.
There are several ways to acquire armor with the “Extra Padding” passive: Unlocking it by completing Major Orders to earn Requisition Slips, purchasing it with Super Credits in the in-game store, and unlocking it through specific Warbonds. For example, the BP-20 Correct Officer Medium Armor and the BP-32 Jackboot Light Armor in the “Force of Law” Premium Warbond both feature the “Extra Padding” passive.
Checking the armor passive is simple: when selecting body armor in the Armory, view the item details screen, where the passive skill will be clearly indicated. The armor card in the game displays the armor type (Light/Medium/Heavy), Armor Rating, and passive skill icon for easy player viewing.
Practical Value in Different Mission Environments
The value of “Extra Padding” becomes more apparent in high-difficulty missions. For example, on “Helldive” difficulty, enemy attacks are much more ferocious, and the extra 50 points of Armor Rating might mean surviving one more attack, which often determines mission success or failure.
The effect of “Extra Padding” also varies when facing different enemy factions. Against Automatons, the all-around protection it offers effectively resists various firearm attacks; while against Terminids, although mobility might be more important, Extra Padding provides a better chance of survival when unexpectedly surrounded.
The synergy between Defense missions and “Extra Padding” is particularly notable. When your team needs to hold a specific position, players equipped with Extra Padding can act as a frontline tank, drawing fire and creating space for teammates to deal damage. Combined with the Shield Generator Pack, an extremely robust defensive line can be formed.
Strategic Significance in Team Loadouts
A rational distribution of passive skills within the team is more effective than stacking a single skill. Ideally, the team should have roles: one player equipped with “Extra Padding” as the frontline, another with the “Scout” passive for reconnaissance, and a third player potentially equipped with the “Engineering Kit” for explosive support.
Synergy of “Extra Padding” with the Medic role: When the team has a dedicated medic, frontline players with Extra Padding can more aggressively absorb damage, as the medic can provide timely healing support.
Coordination with Stratagems: Players equipped with Extra Padding can more safely approach objectives to call in Stratagems, such as Hellbombs or Resupply Pods.
Advanced Usage Tips and Considerations
Weight management is key. Although Extra Padding itself does not affect movement speed, the Medium and Heavy Armor it’s typically found on inherently carries a movement speed penalty.
Coordination of passive skills with weapon choice. Players equipped with Extra Padding are generally better suited for short to medium-range weapons, such as shotguns or assault rifles, as these weapons allow you to inflict significant damage while absorbing hits. Long-range weapons may be less effective than with a high-mobility build.
Situational awareness is more important than pure protection. Even with a high Armor Rating, being overwhelmed is still dangerous. Players with Extra Padding should pay closer attention to their battlefield position and avoid being completely surrounded, as even the highest armor will quickly fall under sustained attack from too many enemies.
Synergy between Extra Padding and Stim usage. Stims provide immediate healing and continuous recovery, and combined with Extra Padding’s high protection, they greatly enhance sustained combat capability. Judicious use of Stims can keep you alive longer during intense firefights.
From Play Style to Team Loadouts
In Helldivers 2, armor selection directly determines your survivability and battlefield role. Unlike many shooters, armor here is not a simple numerical boost but a complex system of trade-offs: stronger protection often means slower movement speed, while higher mobility might come at the expense of survivability.
In-Depth Analysis of Armor Types
Armor in the game is categorized into three main types: Light, Medium, and Heavy Armor, each with significant differences in protection, mobility, and special capabilities. Light Armor, such as the BP-32 Jackboot, offers optimal movement speed and evasion, but has the lowest protection, suitable for players skilled at using cover and terrain. Medium Armor, like the BP-20 Correct Officer, strikes a balance between protection and mobility, making it a reliable choice for most situations. Heavy Armor offers the highest protection value, allowing you to withstand more damage, but significantly reduces movement speed.
Armor Rating is the core metric for measuring protection capability, but it is important to understand that the system may be inconsistent. Some players report that the Armor Rating’s performance in actual gameplay does not match the numerical display, which may affect the expected effectiveness of high-rating armor. Therefore, when choosing armor, one should not only look at the rating number but also consider the overall attributes and passive skills.
Table: Armor Type Characteristics and Recommended Play Styles
| Armor Type | Protection Capability | Movement Speed | Typical Passive Skills | Recommended Play Style |
|---|---|---|---|---|
| Light Armor | Low (Approx. 50-80 Rating) | Fast (+15% Movement Speed) | Scout (Reduces detection range) | Run-and-gun tactics, flanking, reconnaissance |
| Medium Armor | Moderate (Approx. 90-130 Rating) | Moderate | Extra Padding (Increased protection) | Balanced, all-rounder, team support |
| Heavy Armor | High (140+ Rating) | Slow (-10% Movement Speed) | Fortified (Explosive resistance) | Frontline tank, fixed defense, fire magnet |
Analysis of Passive Skills’ Practical Effects
Passive skills are a major consideration in armor selection. For example, the “Extra Padding” passive skill can significantly boost the armor’s damage absorption, while “Ballistic Padding” offers additional resistance to torso damage, explosive damage, and bleeding damage.
Different passive skills suit different combat environments. The “Scout” passive reduces enemy detection range, suitable for stealth play; “Democratic Protection” offers a chance to ignore lethal damage, ideal for high-risk missions; the “Engineering Kit” increases grenade capacity, suitable for tactics involving heavy explosive use.
When choosing armor, considering the synergy between passive skills and your frequently used weapons is important. For instance, players who prefer close-quarters combat might value the melee damage bonus provided by “Servo Assisted,” while players favoring long-range attacks might choose “Stable Platform” to reduce weapon recoil.
Play Style and Armor Matching Strategy
Offensive players are generally better suited for Light or Medium Armor. If you enjoy fast movement, flanking, and surprise attacks, the high mobility of Light Armor allows you to quickly reposition and avoid concentrated fire. For example, in Automaton missions, using Light Armor’s speed can effectively evade rocket attacks and encirclements.
Defensive players should prioritize Heavy Armor. If you are accustomed to holding your ground, protecting teammates, and drawing fire, Heavy Armor’s high protection will allow you to survive longer on the front line. In Defense missions or high-difficulty content, a player wearing Heavy Armor can be the backbone of the team, creating space for teammates to deal damage.
Balanced players most often choose Medium Armor. Medium Armor offers the best balance between protection and mobility, suitable for players who need to frequently switch roles. If you need to participate in both offense and support as necessary, Medium Armor is the most flexible choice.
Team Loadouts and Role Balance
A balanced team armor configuration is more important than individual optimization. An ideal four-person squad should include different armor types: one Heavy Armor player as the frontline tank, one Light Armor player for scouting and flanking, and the other two players choosing Medium Armor or specialized configurations based on mission needs. This division of labor ensures the team’s ability to cope with various situations.
Armor choice should synergize with team tactics. If the team plans an aggressive push strategy, more Medium Armor might be needed rather than Heavy Armor; if the mission requires holding a specific position, the proportion of Heavy Armor should increase. Discussing armor choices with teammates before the mission starts can prevent functional overlap or protection gaps.
Consider the coordination between armor and Stratagems. Certain armor passive skills can enhance the effect of specific Stratagems. For example, armor with the “Explosive Expert” passive can increase explosive damage and radius, coordinating well with Grenade Launchers or air strike Stratagems.
Mission Environment and Enemy Type Considerations
Different mission types require different armor strategies. In Defense missions, Heavy Armor’s high protection is effective against sustained attacks; Scouting and Collection missions value Light Armor’s mobility more; and balanced missions are generally suitable for Medium Armor.
Armor choice should also be adjusted when facing different enemy factions. Against Automatons, high protection offers better resistance to gunfire; whereas against Terminids, mobility might be more important, as many threats are melee attacks that can be evaded with higher mobility.
Environmental factors affect armor effectiveness. Under certain planetary conditions, such as extreme temperatures or magnetic storms, armor attributes may be influenced. High protection armor may offer additional defense in harsh environments, but the corresponding movement speed penalty might also increase risk.
Advanced Tips and Combat Application
Armor switching is a key skill for high-level play. Wise players do not stick to one armor set but switch configurations based on the mission phase. For example, use Light Armor for quick movement during the approach phase, and switch to Heavy Armor for defense upon reaching the objective.
Weight management directly impacts combat efficiency. Although Heavy Armor provides higher protection, the movement speed penalty may make it difficult to escape dangerous situations. On open maps, Light or Medium Armor might be more practical, as they allow for quick repositioning and dodging area-of-effect attacks.
Synergy between armor and Stim usage. Stims provide immediate healing and continuous recovery, and combined with high protection armor, they greatly enhance sustained combat capability. Judicious use of Stims can keep you alive longer during intense firefights.